


Manual
Index
Overview
- User’s interface.
- Loading and saving images.
- Presets.
- Multiple images – HDR.
- Processing.
- Machinery Explorer.
User’s interface
The interface of the program is based on screens grouping the functions associated with the operations on the image.
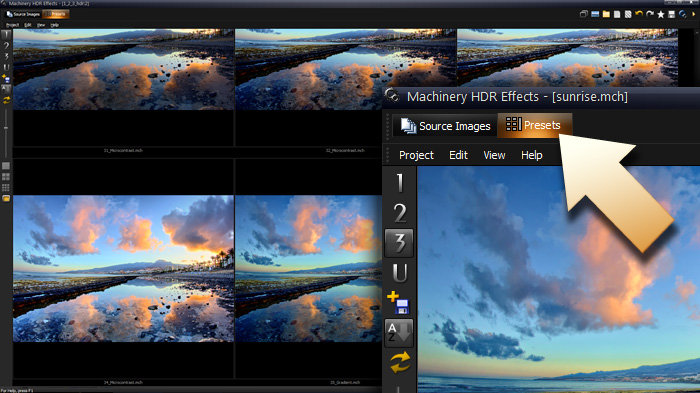
- Source Images – loading and processing images.
- Presets – predefined processing parameters.
Each screen has its own set of menus and tools which can be dragged to an area of choice and attached to the corner of the window. This allows users to adjust the interface to the image’s resolution and proportions.
To change the placement of a selected window, roll your mouse to the title bar and drag it while holding the left mouse button. You can increase the available preview space by switching to full screen view. To do this go to View -> Full Screen Mode (F11).
Project
The project contains a list of loaded images along with their processing settings. Launching the program automatically begins a new project, where you must load an image in order to process it.
Loading Images
Machinery works with all the most commonly used 8 and 16 bit file formats (JPG, TIFF, BMP, PNG), as well as RAW formats:(DNG, CR2, CRW, ARW, NEF, RAW, DCR and others…)
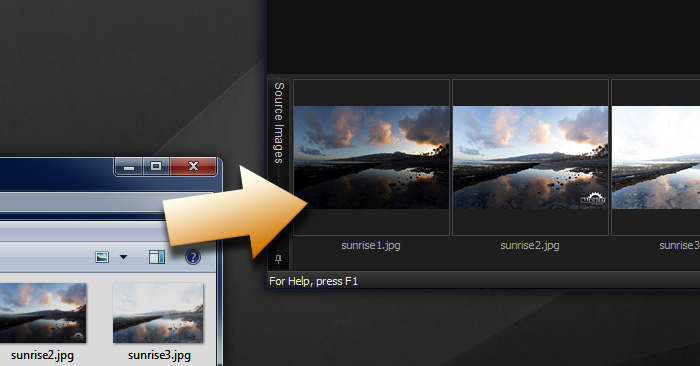
Users can load images in several ways:
- By accessing menu Image -> Open Images / Add Images.
- With the help of the Edit option in the Machinery Explorer app.
- With the help of the context menu Image -> Open Images / Add Images in Source Images pane.
- By double clicking on an empty spot in the Source Images pane.
- By dragging images in a Windows file to the preview window or the Source Images pane.
- By going to menu Image -> Transfer from Explorer – the first image from a list in the Machinery Explorer app’s project file will be loaded.
- By entering the names of the images as parameters in the Windows command line.
The list of loaded images can be seen as miniatures in the Source Images pane. Hold the cursor on the miniature to magnify the image and see EXIF data.
Saving Images
MACHINERY saves images in 16-bit TIFF and 8-bit JPG, TIFF format files. The image currently visible in the preview window is the one that is saved. MACHINERY saves only images that have been processed. If the program is still processing the image, a status line is visible on the bottom of the screen. An image can be saved using Image menu -> Save / Save As….
You can quickly export your saved image to a different graphics program – select the Image menu -> Open in External Editor option and every saved image will be automatically opened in the default program. If the default program is not proper you can change this setting in the Configuration in the tab “External editor”.
The size of the saved image depends on the chosen Preview mode selected in menu View. The Demo version allows the user to save an image up to 1280×1280 pixels.
In the saving dialog box the following options are available:
- Change dimensions – reduces the image to a specified size.
- DPI – sets resolution of the image.
- Convert image profile to sRGB – available if the image uses the color profile. Use this option when you want to publish the image in Internet.
- JPG compression.
- LZW compression (TIFF files).
The program bundle includes an additional app, Machinery Explorer. Explorer makes searching for images and viewing photos easier. It also creates a list of images for batch processing. In order to quickly load an image, use the Edit option.
Great effects with just a single click of the mouse!
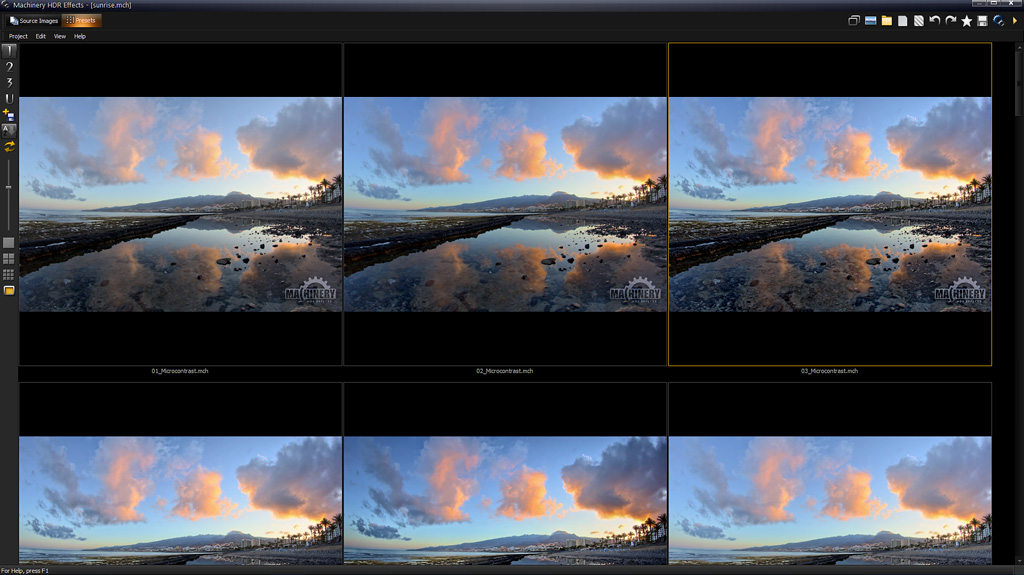
After loading of images go to the “Presets” tab and use one of the predefined settings. Wonderful effects are at your fingertips – it couldn’t get any easier.
Predefined settings are grouped into 5 folders: – Folders 1, 2 and 3 – folders containing predefined presets supplied with the program. – U – folder contains user’s presets. 3D LUT – folder contains color grading presets (see chapter 4, section 3D LUT). Choose a folder by clicking on icon 1, 2, 3, U or 3D LUT.
- To create your own preset, load any image, set processing parameters, and then choose Edit -> Save as Preset from the menu. The program will suggest a catalog ‘U’ – User’s presets, but you can also save the preset in any Windows folder. If the preset is saved in folders 1, 2, 3 or U, its miniature will be visible within a few moments.
- You can adjust the size of the displayed miniatures to fit your monitor. Use the scroll bar or predefined size settings in the toolbar on the left.
- You can change the name of your presets or delete them by right-clicking on the miniature and choosing an option from the context menu.
- You can change the order of presets according to creation date, name or modification date with the help of the sorting icon on the toolbar on the left.
Vista or Windows 7 can block saving presets to the User’s Preset folder due to lack of authorization. To launch the app as an Administrator follow these steps:
- Open Machinery folder. You can access Machinery folder selecting: Start -> All programs -> Machinery HDR Effects -> Machinery folder.
- Right-click on the “Machinery.exe” icon.
- Choose “Run as Administrator”.
You can compare the processed image with the original in every moment with use of a right mouse button in the screen. There is also available the option Show preview of the original image in the Navigation Pane, which divides the view in two parts – the original and the processed image.
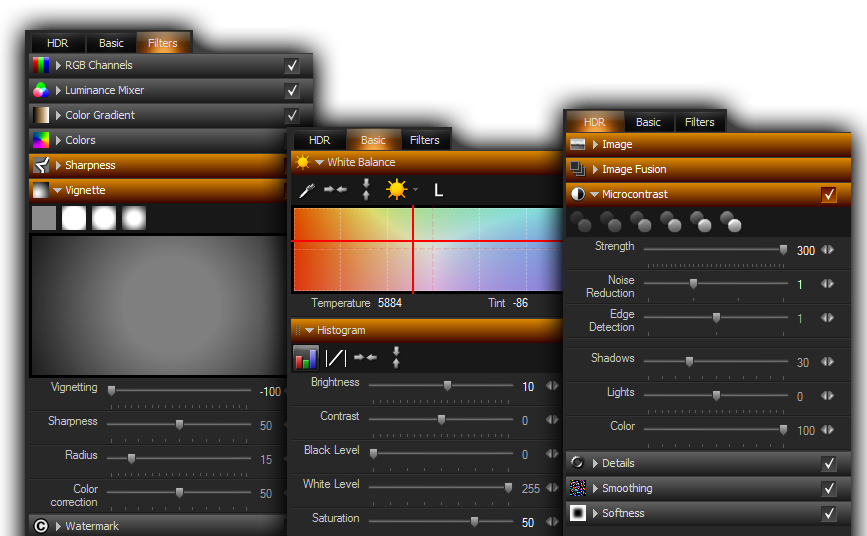
Panel of effect
Processing options are grouped in drop-down panels (effects). Each effect can be enabled in every moment with the use of a “checkbox” which is located on the right side of the panel. Highlighted header of panel indicates that parameters have different values than neutral. Thanks to this you can check with ease if the given effect affects the image.
- Image – Image options
- Image fusion – merging images into HDR.
- Microcontrast – Increase the level of local contrast.
- Details – Increase the level of visible details.
- Smoothing – Remove noise and artifacts caused by increase of details level.
- Softness – Add depth to the image if level the image appears to be flat after the increase of details.
- White Balance – color temperature adjustment.
- Histogram – basic image adjustment (brightness, contrast, saturation etc.).
- RGB channels – Adjust the level of individual color channels (All, Red, Green, Blue).
- Luminance Mixer – Adjustment of brightness by color channels. The effect dedicated for black and white photography.
- Color Gradient – Give the color in the chosen shade to the image.
- 3D LUT – Color grading.
- Colors – Detailed adjusting of saturation and color.
- Sharpening – Increase sharpness of the image.
- Vignette – Change the exposure of the photo corners.
- Watermark – Adding a watermark to the image.
Processing parameters
Processing takes place immediately after the change of the list of images and after any change of processing parameters of any tab. A status bar at the bottom of the application indicates the current progress of processing and the operation being currently executed.
The settings with a list of images being processed may be saved as a Project by use of the menu Project -> Save / Save As…
The settings can be saved in cache memory and restored if needed. To do this use the option the menu Edit -> Store Settings and Restore Settings.
With the use of the next option the menu Edit -> Load Preset you can load the settings from another Project but without loading of the list of images.
Neutral settings are reseting all parameteres to neutral values.
Speed of processing
Processing of very large images requires a huge amount of calculations. To speed up the time of the adjusting of parameters you can use the option of the menu View -> Preview and reduce the size of the image on time of processing. After selecting of parameters, switch back to Full size. The preview option can be set as the default in the Configuration of the program. Thanks to this it will be turning on automatically for every new photo.
The full view option is available only in a full version of the program.
Machinery processes parallel on multicore processors, with using NVIDIA accelerators and it is also available in a 64-bit version to take the full advantage of the power of your computer!
Machinery Explorer
The program includes an additional app – Machinery Explorer – which makes finding and viewing images much easier. It also makes it possible to create a list of images for batch processing.


HDR Functions
- Image.
- Image fusion.
- Microcontrast.
- Details.
- Smoothing.
- Softness.
- Dynamic Contrast.
Image
Image options before processing
Noise Reduction
If the source image has visible distortions “noise”, or visible JPG compression artifacts, reduce with the help of Image -> Noise Reduction. The program’s configuration options lets you choose if this option should be launched automatically for every new project.
Panorama Mode
Set this option if the image you are loading is a panorama (the left and right edges fit).
Remove Chromatic Aberration
Chromatic aberration is a phenomenon caused by distortion of the lens. The effect can be generally seen in dark edges adjacent to bright areas of an image; it looks like an out-of-focus ghost of magenta or purple color. In photography this is also called “purple fringing”. Chromatic aberration can be removed by selecting this option.
Image Fusion
Merging images into HDR.
What photos are the most suitable to obtain effects?
If you have a few frames with various exposures the program will combine them and choose the best fragments without your assistance.
If you have only one frame, use well-exposed photo without deep shadows and high contrasts. If you have image with poorly visible details in the dark sections, use the Bracketing option from the context menu for “Source images” to generate additional frames.
HDR Mode
Machinery has three different techniques for merging together HDR images.
Natural HDR
The program creates one image with a dynamic range that incorporates all loaded frames. This mode fully eliminates the glow (halo) effect, but can generate images with low contrast.
Natural HDR + Microcontrast
If the image created with the “Natural HDR” mode does not have enough contrast, you can fix the problem with the help of the Microcontrast effect, available in the HDR tab.
It is recommended to create HDR images using the Natural HDR mode and then increasing the Microcontrast level.
Contrast Detection
The program chooses the best fragments from selected frames. Transitions between frames are very gradual, which can show up as a darker or lighter glow in areas of high contrast. The advantage of this mode is that is keeps the contrast of the original frames.
Edge Detection
The program chooses the best fragments from selected frames. The transitions between frames are more abrupt than in the “Contrast Detection” mode because the algorithm detects the edges of objects in the frame. This mode allows users to substantially eliminate the glow visible in the “Contrast Detection” mode. The advantage of this mode is that is keeps the contrast of the original frames.
Auto-alignment of images series shifts
Sharp shots consisting of several frames, even if you take series of photos “from hand”. Use the option Image Fusion -> Align Images to enable auto-alignment. Access program configuration to turn on automatic alignment for each new project.
Deghosting
If the successive images have shifting objects, e.g. a car driving past of moving people, the stitched image will contain so-called “ghosts”, visible as blurred or semi-transparent fragments. To remove this effect, go to Image Fusion -> Remove Ghosts in the HDR pane. Access program configuration to turn on automatic deghosting for each new project.
Microcontrast
Increase the level of local contrast.
- Microcontrast – increases contrast locally. An algorithm analyzes the area around processed points and changes contrast by grouping together similar points situated close to each other.
- Edge detection – The higher the value for this parameter, the more precise the detection of contrast.
- Noise Reduction – Remove noise and artifacts caused by increase of Microcontrast level.
- Shadows – changes the brightness of dark parts of the image.
- Highlights – changes the brightness of the lightest areas of the image
- Color correction – defines how the extent to which saturation will be altered along with a change of brightness.
Details
Increase the level of visible details.
- Small contrasts – defines the level of details for small contrasts (areas surrounding processed points).
- Large contrasts – defines the level of details for large contrasts (areas situated further from the processed points).
- Edge detection – The higher the value for this parameter, the more precise the detection of contrast.
- Color detection – Increase precision the detection of contrast.
- Noise Reduction – Remove noise and artifacts caused by increase of Details level.
- Greater Noise Range – Increase range of noise reduction.
- High contrast – Defines a method for increasing the level of detail.
Smoothing
Remove noise and artifacts caused by increase of details level.
You can define the strength, location and size of contrasts that are to be smoothed out.
- Dust & Scratches – enables reduction of dust (small, isolated points).
- Noise (color) – reduction of color noise.
- Noise – add smoothness to the smallest details (noise reduction).
- Small contrasts – defines the level of smoothness for small contrasts (areas near the processed point).
- Dark / bright areas – masks (conceals) detail smoothing in dark and bright areas of the image. A value of 100 means complete visibility, while 0 – effect is completely absent.
Softness
Add depth to the image if level the image appears to be flat after the increase of details.
The result of increasing detail levels may be a “flat” image. The image may have huge amounts of small details everywhere, making it difficult to focus on the photo’s composition.
The Softness effect will emphasize large contrasts, making them more visible.
You can use parameters to control the area (size of large contrasts) and the strength of the tool.
- Area size – the size of the area (contrast) around analyzed points. The smaller the area, the more the visible the effect.
- Dark / bright areas – masking (concealing) effects in dark and bright areas of the image. A value of 100 means complete visibility, while 0 – effect is completely absent.
Dynamic Contrast
Increase the level of local contrast.
- Strength – increases contrast locally. An algorithm analyzes the area around processed points and changes contrast by grouping together similar points situated close to each other.
Basic operations
- White Balance.
- Histogram.
White Balance
If the colors in the loaded image are too warm or too cold – use the color temperature adjustment option.
Using the Dropper tool in the White Balance toolbar to indicate a point which should have a neutral hue, e.g. a white sheet of paper and the program will automatically set the correct color temperature.
You can adjust the color temperature separately for brightest parts of the image by clicking the “L” icon.
Histogram
Basic image adjustment.
- Brightness
- Contrast
- Saturation
- Black Level – sets the location of a pure black area. Adjust if the image contains areas which should be completely black. Visible on the histogram as a white vertical line on the left.
- White Level – ets the location of a pure white area. Adjust if the image contains areas which should be completely white. Visible on the histogram as a white vertical line on the right.
The Black level, White level, and Brightness can be adjusted directly on the histogram.
Filters
- RGB channels.
- Luminance Mixer
- Color Gradient.
- 3D LUT
- Colors.
- Sharpness.
- Vignette.
- Watermark.
RGB Channels
Adjust the level of individual color channels (All, Red, Green, Blue).
The program offers four channel regulation panels:
- RGB – allows the user to adjust all channels at once.
- R – adjustment of red channel.
- G – adjustment of green channel.
- B – adjustment of blue channel.
Adjustments are made by adding or changing the location of control points. Points can be added by indicating them on the image with the help of the Dropper tool available on the toolbar in each panel.
You can quickly restore neural settings for each panel by removing all control points.
Luminance Mixer
Adjustment of brightness by color channels.
Brightness of the image’s points is determined according to proportions for each RGB channel:
The red channel – 30%; the green channel – 59%, the blue channel – 11%. You can use the “Luminance Mixer” to change the proportions of the colors.
The effect is dedicated for black and white photography
Typical objects on photos have approximate RGB proportions, e.g. the sky has the highest percent value for the blue channel, plant life – for the green channel, people’s skin – for the red channel.
By changing these proportions you selectively impact the image’s brightness – the greater the percentage of a given channel in the image, the greater the impact.
The Color Correction parameter determines the extent to which saturation will be altered along with a change of brightness.
You can quickly restore neutral settings by clicking on the first predefined settings panel on the toolbar.
Color Gradient
Give the color in the chosen shade to the image.
The program offers a choice of 15 predefined color gradients. After choosing a gradient you can adjust the way it is added to the image.
Adding a gradient adjusts the hue and saturation; the image’s brightness remains the same.
- Opacity – a value of 0 means no effect; 100 – completely changes the color of the image.
- Saturation – changes the gradient’s saturation. The effect does not alter the image directly, but changes the colors of the gradient.
You can quickly restore neutral settings by choosing the first predefined gradient – located in the upper left-hand corner of the gradient window.
You can also create your own gradient and adjust predefined gradients.
The gradient can be adjusted via four points; their position defines the brightness, hue and saturation.
The brightness scale is fixed: 1(10%), 2(30%), 3(70%), 4(90%). By changing the location of the points you can adjust the hue (Y axis) and saturation (X axis).
By choosing the second of the predefined gradients you will create a grey-scale image. This is much quicker than decreasing saturation to 0 in the Colors panel.
3D LUT
3D LUT is a table of colors which is used for transforming images. The name is well known to film makers who apply 3D LUT for giving specific style to their films. It often emulates analogue film tapes. Machinery uses 3D LUT with the help of “.cube” file format. 3D LUT files aren’t included into the installer because of copyright but below is a list of sites where you can download it for free.
- http://luts.iwltbap.com/
- http://lutify.me/free-luts/
- http://www.premiumbeat.com/blog/29-free-luts-for-video/
You can generate a color preset from any photo and video editing application – Lightroom, Photoshop, Camera Raw and more.
The process is very simple. Click on ‘Presets -> Edit -> 3D LUT test image’ to generate a image with color pattern. Open this TIFF into your favorite photo editing application and apply a color correction on the pattern. Save it as TIFF without lossy compression. Return to the Machinery, use the option ‘Presets -> Edit -> Create 3D LUT preset’ then select just saved image. New preset will be visible in the 3D LUT Presets window.
- Opacity – Strength of the effect.
- Preserve luminosity – 3D LUT often changes not only colors, but contrast and gamma too. To keep original brightness of the image and allow only color change turn “luminosoty’ option on.
- Add to favourites – Add current used .cube file to the Presets.


Colors
Detailed adjusting of saturation and color.
The program offers 3 color adjustment panels:
- Saturation of Lights and Shadows – adjust saturation by brightness.
- Saturation – adjust saturation by color.
- Hue – substitute one color with another.
Adjustment involves adding or changing the placement of control points.
The points can be added by indicating places on the graph or on the image with the help of the Dropper Tool available in the toolbar on each panel.
A horizontal line running through the middle of the panel indicates neutral settings.
Sharpness
Increase sharpness of the image.
The final step for processing your image is to set the desired level of sharpness.
The Sharpness panel allows you to change sharpness intensity, area and threshold.
- Sharpness – set the intensity of the effect.
- Radius – increase contrast around chosen points in the image. The Radius parameter lets the user choose the size of the processed area. Excessive values will cause edges to be overly magnified.
- Threshold – determines what will be affected by the sharpness filter. The higher the value of this parameter, the less the filter affects flat surfaces with low levels of detail, while adding sharpness to areas with visible details and edges. Increase the value of this parameter if the filter had caused excessive noise in the image.
Vignette
Use this effect to change the brightness in the periphery of the image.
You can control the strength, range and manner of the effect.
- Vignetting – a value over zero will make the edges brighter; a value below zero will darken the edges.
- Sharpness – defines how the change in brightness will progress. A value of 0 means that the changes will progress with the same strength in the direction of the edges. The higher the value of the parameter the weaker the changes of brightness in the center of the image.
- Radius – defines (in %) the size of the area in the center of the image that will not be affected.
- Color correction – defines how the extent to which saturation will be altered along with a change of brightness.
Setting the Vignetting parameter to a value below zero will make the image darker. You can use this effect to draw out the main theme of the image, if located in the center.
Other
- Batch processing.
- Plugin for Adobe Lightroom®.
- Solving most common problems.
Batch processing
You can easily process a series of images using the same settings with the help of the batch processing option.
Before you begin batch processing, create a settings file. Load an image, choose parameters, and then save the settings as a Project or Preset.
Machinery Explorer
Use the Machinery Explorer app to create a list of files that will be processed, then run the Batch Processing command to transfer the list to the main program.
To create a group composed of several images, select the images and then click on the Merge option available in the context menu (all of the selected miniatures will have this option – choose it from any of them).
You can quickly combine several images into groups of the same size. Click on an empty spot in the Project window (Machinery Explorer), and choose the Merge option to define the size of the groups to be combined. After confirming all files from the Project window will be merged into groups.
After choosing the Batch processing option, the program will switch to the main Machinery app.
Destination folder
The destination folder is the folder where your processed files will be saved. You can also save files in their source folder. If you want to save your files in their source folder, choose the Replace existing file or Add suffix to processed image option, as otherwise the program will display an error message informing that a file with that name already exists.
Saving options
Choose previously saved settings and set the format of saved image.
You can additionally reduce the size of each processed image and set the DPI parameter. The TIFF format is available only in the program’s full version.
Image parameters
Batch processing ignores the following saved file settings:
- Preview.
- Noise reduction.
- Align images.
- Deghosting.
- Bracketing.
- Panorama mode.
- Remove chromatic aberration.
These parameters have to be set manually every time you use batch processing.
The Bracketing +/- 2 options create two additional frames for processing with +/- 2EV correction. This function is available only when processing a single image.
To commence processing
Processing commences after clicking on the Process option. Progress and currently processed images can be seen in the window on the right.
In case of an error (if the Abort on errors option has not been turned off), all processing will be terminated immediately.
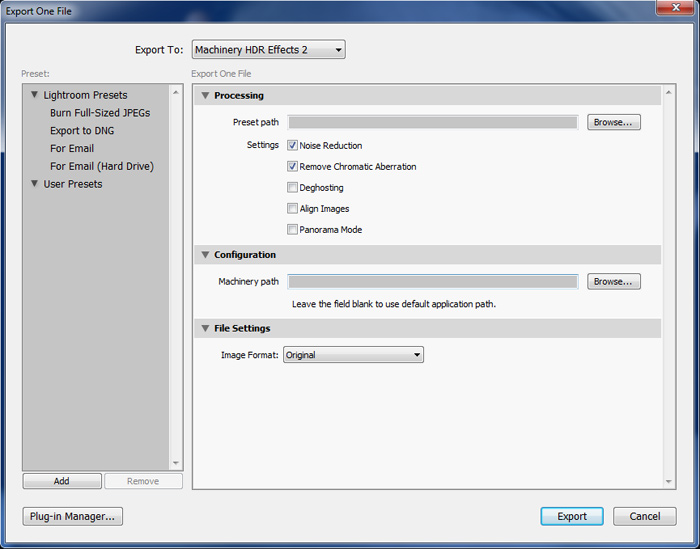
Plugin for Adobe Lightroom®.
Installation.
Open Machinery folder and copy MachineryHDR2.lrplugin folder to Adobe Lightroom modules, typically:
C:\Users\[Name]\AppData\Roaming\Adobe\Lightroom\Modules\
If the Lightroom folder does not have a Modules folder, create one.
Using
To use the plugin, open Lightroom, select one or more images and open the context menu (right click) with the Export option. A dialog window with export options will appear. Machinery will open once you select Export, and it will load the selected images.
After selecting processing parameters use the Save As option to save the image and then close Machinery. Lightroom will import images processed by Machinery to its library.
Solving most common problems
The size of an image is reduced to 1280 pixels.
Processing of very large images requires a huge amount of calculations. To speed up the time of the adjusting of parameters you can use the option of the menu View -> Preview and reduce the size of the image on time of processing. After selecting of parameters, switch back to Full size. The preview option can be set as the default in the Configuration of the program. Thanks to this it will be turning on automatically for every new photo.
The full view option is available only in the full version of the program.
Saved image cannot be opened in any program.
Check if the file has a .jpg or .tiff extension. Make sure you are saving images via the Image Menu option, and not via Project Menu.
Problems with saving presets.
Vista or Windows 7 can block saving presets to the User’s Preset folder due to lack of authorization.
To launch the app as an Administrator follow these steps:
- Open the catalog containing the installed program.
- Right-click on the Machinery.exe icon.
- Choose the Run as Administrator option.
Glossary
High dynamic range imaging
High-dynamic-range imaging (HDRI or HDR) is a set of techniques used in imaging and photography to reproduce a greater dynamic range of luminosity than is possible with standard digital imaging or photographic techniques. The aim is to present the human eye with a similar range of luminance as that which, through the visual system, is familiar in everyday life. The human eye, through adaptation of the iris (and other methods) adjusts constantly to the broad dynamic changes ubiquitous in our environment. The brain continuously interprets this information so that most of us can see in a wide range of light conditions. Most cameras, on the other hand, cannot.
HDR images can represent a greater range of luminance levels than can be achieved using more “traditional” methods, such as many real-world scenes containing very bright, direct sunlight to extreme shade, or very faint nebulae. This is often achieved by capturing and then combining several different narrower range exposures of the same subject matter. Non-HDR cameras take photographs with a limited exposure range, resulting in the loss of detail in highlights or shadows.
Tone mapping
Tone mapping is a technique used in image processing and computer graphics to map one set of colors to another to approximate the appearance of high dynamic range images in a medium that has a more limited dynamic range. Print-outs, CRT or LCD monitors, and projectors all have a limited dynamic range that is inadequate to reproduce the full range of light intensities present in natural scenes. Tone mapping addresses the problem of strong contrast reduction from the scene radiance to the displayable range while preserving the image details and color appearance important to appreciate the original scene content.