Instructions
Screen
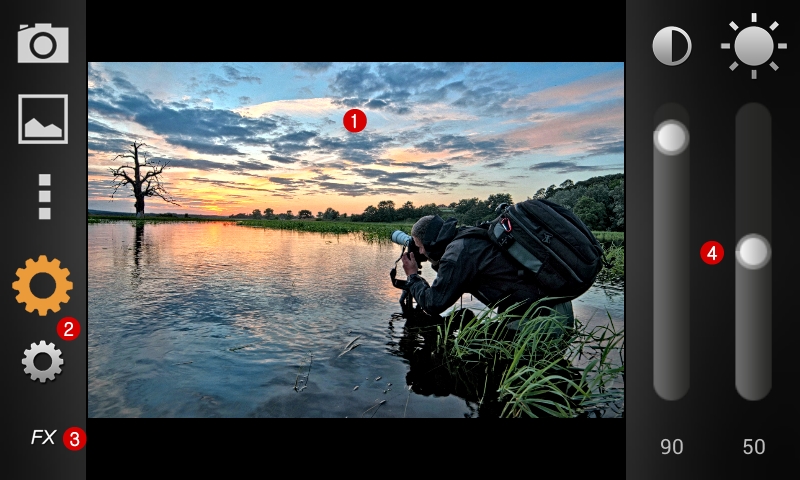
- The center of the screen (1) contains an image with the applied effect - Image view
- Taking, loading and saving images takes place using icons in the upper left-hand corner of the screen - Managing images
- To obtain effects use: gears (2), list of effects (3) and sliders (4) - Creating effects
Image view
You can view images in a horizontal or vertical layout.
Touch the screen to compare the effect with the original image.
Managing images
Taking an image
 The application uses your built-in camera to take a photo. Once you have taken a photo, the app saves it and starts processing.
Loading an image
 You can also upload images from your gallery, saved on your SD card.
Saving an image
 Processed images can be saved on an SD card, in Machinery's folder.
Images are saved in JPG or PNG formats.
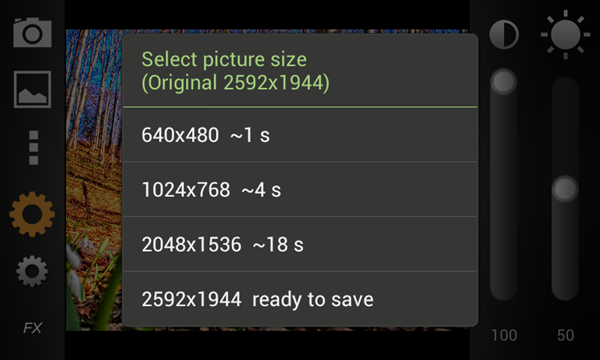
Before saving an image you can choose the resolution you want to save it in. If you want to save an image in its current resolution there are no further steps to be taken. If you want to resize your image, it will be reloaded and reprocessed. The application provides estimated processing times for various resolutions.
Sharing an image
 You can publish your images online, email them, etc. You can choose image resolution, just as when saving an image. If you want to change image resolution your photo will be reloaded and reprocessed. You will then see a list of available sharing options.
Creating effects
Gears

 Once you have taken or loaded an image, the application immediately processes it using current settings. Turning gear indicates that the image is being processed. During this time you can change the position of sliders or choose effects from the list.
The application analyzes details found on your image to create an HDR effect. To obtain a better effect the app can process the image in two ways represented by the two gears. For images taken from up close (e.g. portraits), the larger gear is the better choice; for images taken from afar (landscapes) choose the smaller gear. The differences may appear slight on devices will small screens.
Color effects
 Drop-down list of color effects. After selecting an effect the effect in use will appear in place of the FX sign.
 An empty frame signifies that no additional effect is in use.
 Increases color saturation.
 Decreases color saturation.


You can apply various color effects to your images.
Contrast and brightness
 Changes HDR strength.
 Changes image brightness.
Other functions
 Here you will find icons for functions not available on the main screen.
 Brief help.
 Machinery's website.
Back to top
Machinery's website.
Back to top